Before we start
A tutorial about how to making a blog like this for yourself!
In this tutorial, we will use hexo as the blog framework and github as the server to deploy our blog. (so you don’t have to buy a server).
I will make everything as clear as possible so any new starter can follow along.

Ok, Let’s do it
I’d say it would take approximately 3+ hours for an experienced programmer to build a blog like this, and maybe 8+ hours if this is your first time building a blog. (with personalized theme and url)
1. A New Github Repo
Create a new github repo called yourGitHubUserName.github.io on your github. Here is my repo as an example.
2. Download Git and set info
Download Git first if you haven’t done so.
Then, open your terminal or command prompt (I’ll just all it command from here) and set user.name and user.email info. You can do it from some root dir.
do not put the quote in your command, and remove “–global” if you do not wish to set a global info.
git config --global user.name "yourGitHubUsername"
git config --global user.email "yourGitHubEmail"
3. SSH key
Now we generate an ssh key and link it to our github (so later we can deploy blog to your github repo smoothly without entering username and password every time we deploy)
ssh-keygen -t rsa -C "yourGitHubEmail"Hit enter three times for the default location with no password.
If it says something about already exists a ssh key, it is up to you to create a new one or use the old key. If you generate a new key, the old key can no longer be used for the repo linked with it. (Just saying is for students that maybe have a different github account linked to school. Two accounts cannot share the same ssh key.)
Find the file called “id_rsa.pub” on your laptop or copy the following code to your command to display “id_rsa.pub”‘s content in your command window:
cat ~/.ssh/id_rsa.pubCopy everything in the file, starting and including “ssh-rsa” all the way to “@xxxmail.com”. This is your public key that you will put on github and share with others.
Also notice there is a file called “id_rsa”. This is your private key and never publish this online or share it with anyone. If you are interested in how RSA key works and its algorithms, check it out here!
Now Open GitHub Setting Keys page and create a new SSH Key.
Use any title your want, and paste the key you just copied. Click “Add SSH key” to save the key.
To check if you setup the key successfully, copy and paste the following code into your command and hit enter.
ssh git@github.com4. Download Node.js
Hexo is based on Node.js. Download Node.js here.
After you download it, use the following the command to check if your Node.js and npm is installed successfully. If you see the version number then you are good to go!
node -v
npm -v
Now we are set up everything we need for start using hexo!
Hexo
Let’s begin using hexo and building our blog!
5. Install Hexo and init a blog folder
Now we install hexo with npm:
npm install -g hexo-cliNow that we have hexo installed, go to the directory that you want to build your blog. Let’s say I want my blog folder “myBlog” under “myDocuments”. You re-direct location of your command to “myDocuments” and type the following:
hexo init myBlog
Replace myBlog with whatever name you would like your blog to be.
Notice that you do not create the “myBlog” folder yourself. The init command following a name create the folder. To init hexo under an already existing (has to be empty) folder, re-direct location of your command under that folder (eg. xxx/myDocuments/myBlog) and type hexo init.
6. Generate and display blog
We have a default hexo blog ready! Let’s use the following command to generate and display our blog.
In the myBlog directory, type the following command:
hexo generate
hexo server
Now, our hexo blog is live on our computer! Open a web browser and enter the following address:
localhost:4000If it is displaying, congrats!
You can close the sever with ctrl+c now.

7. Git deploy setting
Now we connect our hexo blog to our github repo.
In your github repo, click the green button “Code” with a little drop down arrow. Select SSH and copy the entire address that looks something like “git@github.com:yourUserName/yourUserName.github.io.git”. 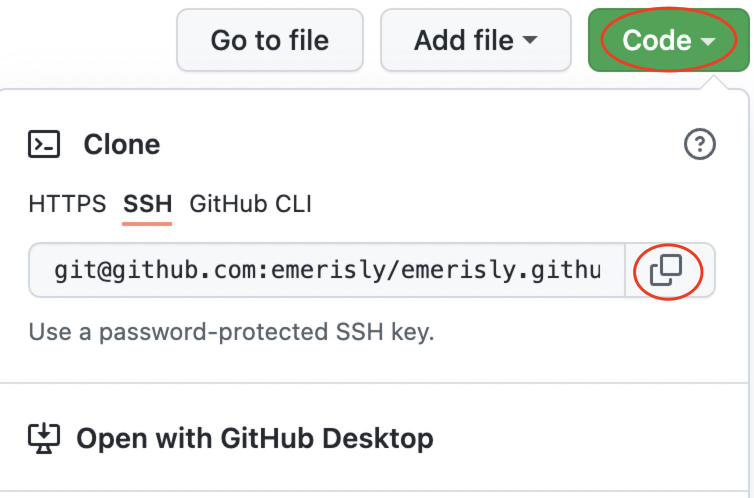
Find a file called “_config.yml” in the blog’s root directory and open it.
Copy and paste the following code to the end of the “_config.yml” file:
deploy:
  type: git
  repo:  Paste_the_address_your_just_copied_here
  branch: master
Do not forget to change the repo address, and make sure the indentations before “type”, “repo”, “branch” is correct. Save the file.
Note that there is another “_config.yml” in root/themes/ directory. This is the config file for themes that you use to change settings for your chosen theme later. the “_config.yml” in root is to change setting for your whole blog.
8. Deploy your blog
Go back to the command (under dir of the blog folder) and paste the following, this lets hexo directly deploy blog to github:
npm install hexo-deployer-git --saveNow we are good to deploy!
Type the following three command:
hexo clean
hexo generate
hexo deploy
Congrats! Your blog is now deployed to your github! Visit it on a web browser with the url https://yourGitHubUsername.github.io/.
A tip: you can use “hexo g” for “hexo generate” and “hexo s” for “hexo server”. Check here for other useful commands.
Every time you’d like to view your blog on your local server, use the command hexo clean, hexo g, hexo s. If you want to deploy it to github, use hexo d.

What’s more
You are pretty much done with our basic structure of the blog! Yay!
Here is two more things you might consider doing with your blog.
9. Pick your own theme
You can chose your theme here. Hexo offers so many cool themes! Pick one that many people use for a better experience with more detailed guides around building the theme and more Q&A as well as more people that is using the theme to help you.
There are many build-in personable features some themes provide. E.g. background, front, word count, key word search, comments.
Choose carefully if you want your blog to be a long term thing. You don’t want to invest months into a theme and later found out it does not have enough build-in features for you.
You can find a detailed guide on how to use any specific theme. Check out their theme’s README in the their github repo. They will lead you from now with more personalized themes!
Personally I picked my theme just because I love the click animation haha.
10. Personalize your url
You can personalize your unique url (will need you to pay and rent a domain). I’ll write it in a separate blog here!
It’s not that useful but it looks super cool!
The End
Thanks!

- Post link: http://example.com/2022/01/07/how-to-make-your-own-blog/
- Copyright Notice: All articles in this blog are licensed under unless otherwise stated.